Showing posts with label dairy-free. Show all posts

Saturday, 9 May 2015

{banana & date pikelets with hermie}


It has been a long time since I posted a blog post on here. 

There are many excuses however that main reason is because we are expecting our third little person. Now that I'm over halfway, I'm finally able to muster up some energy to put a bit of love back into my cooking. This does not mean however that I can always find the energy to go to the shops and buy all my ingredients for those 'special' recipes that I really want to try.

So, these pancakes are a favourite of mine to make and eat because they have few ingredients and are tasty and easy. When you look over at your fruit bowl and see a sad, tired looking banana you don't have to make a banana cake anymore but can have a go at these instead. They are not only a breakfast food in our house but an afternoon snack choice too for the little ones.

I hope you enjoy (and might even have them for Mother's Day breakfast tomorrow!) xx

4 Medjool dates, seeds removed
1 large ripe banana (~180-190 grams), peeled
20 grams nuttelex (or butter or coconut oil)
180 grams Self-raising flour
sprinkle of bi-carbonate soda
280 grams milk of choice (I use soy milk to make it dairy free)

1. Add dates into TM bowl and chop 10secs/speed7. Scrape down sides of bowl.
2. Add banana and nuttelex into bowl and mix 5secs/ speed4. Scrape down sides of bowl.
3. Add flour, bi-carb soda and milk into bowl and mix 10secs/speed 4.. Scrape down sides of bowl ready for pouring pikelets into fry pan.
4. Heat fry pan on a medium heat and pour pikelet size drops into pan to cook. Flip over when bubbles appear on the surface.
5. Serve with you choice of toppings. Ours are maple syrup & cream, ice-cream, jam or plain.

Makes 18-20 pikelet size morsels

TIP: I use a 30cm frypan to cook 4 at a time. I find this saves a lot of time versus a smaller pan and I can make a coffee in between batches :-)


Monday, 15 September 2014

{san choy bao in hermie}


Oh no, I've been neglecting this blog for so long that guilt is creeping in. I have been inspired in the last few months by lots of different things but finding the time to write up my latest experiments in the kitchen has been lacking. But, now I think I have my mojo back. Why? Well, in case you haven't heard, here in Australia the launch of the new TM5 has occurred just over a week ago. Having Hermie 2.0 in the kitchen is very exciting as there are some great new features... but this is not what this post is about. That will be in a separate one in the near future.

Isn't this supposed  to be how to make san choy bao using Hermie? Yes it is and I think it fits in very well with all the different ways that people are eating these days. What I'm referring to is the latest diet craze or food allergy/intolerance. Although I have never been on any dieting bandwagon, I have experienced food intolerance and allergies myself and within my little family. These include lactose intolerance, dairy allergies, nut allergies, following the FAILSAFE diet and FODMAP. I think we've pretty much got all bases covered.

So, san choy bao is one of those dishes which is Asian flavour based (which is my favourite) and ticks lots of categories including:
- gluten free
- wheat free (check the sauces you're using)
- dairy free
- grain free
- carb free
- high protein
- and most importantly delicious.

It is easily made from the staple ingredients from an Asian Pantry as well as some fresh food items. A bonus is that it is very quick to make and the kids have fun 'making' their own little lettuce cups. Enjoy!

3-4 dried shitake mushrooms
15 grams ginger, peeled, roughly chopped
1-2 cloves garlic, peeled
1 small-medium carrot, peeled, roughly chopped 3-4cm
450-500 grams pork mince
20 grams vegetable oil (canola, rice bran, peanut etc)
12 baby cos lettuce leaves (your cups)
big handful of beansprouts (or to taste)
1-2 spring onions, chopped to 1cm lengths
20 grams Shao XsIng wine
10 gram light soy sauce
15 grams dark soy sauce
10 grams oyster sauce
40 grams hoisin sauce

1. Place mushrooms into bowl and pour over hot water to cover and soften mushrooms
2. Place ginger, garlic & carrot into TM bowl and chop 5secs/ speed5. Scrape down sides of bowl.
3. Add pork mince and oil to TM bowl and saute 6mins/ varoma (TM5=110C)/ speed1/ reverse
4. Meanwhile, drain water from mushrooms and dice (using a knife) into 0.5cm pieces and wash the 12 lettuce leaves and beansprouts and set aside for later.
5. Scrape down sides of bowl and with spatula, stir the bottom around.
6. Add wine, soy sauce, reserved mushrooms and spring onions into TM bowl and cook 4mins/ varoma (TM5=110C)/ stir speed/ reverse
7. Scrape down sides and add in dark soy, oyster sauce and hoisin sauce. Cook 2mins/ 100C/ stir speed/ reverse.
8. Once complete, pour into thermoserver and serve by scooping into reserved lettuce cups and topped with bean sprouts.

Bon Appetit xx

Serves 2-3 depending on appetite


Note: Great for finger food. Just need to use the tiny baby cos lettuce leaves and a teaspoon of filling.

Sunday, 27 July 2014

{soya bean drink in hermie ... asian style}


I was always the soya bean drink person and my sister was the opposite with her choice being a chrysanthemum tea or the like. This was of course when my mum did the weekly grocery shop at the Asian Grocer and we asked for a yeos 'fruit box' of choice for the ride home. When you're that young, try explaining the difference in the Asian style soya bean drink and commercial western soy milk to your friends! They are very different and one mistaking the other can lead to an accidental dislike for something that is so yummy.

So, at attempt #5, I am finally able to say that I think I have mastered the making of an Asian style soya bean drink. This leads to so many things. Not only can I determine the sweetness of the drink, but if minimal or no sugar is added, using a few extra steps, we can then make tofu and also tau foo fa (the sweet Asian dessert that is soo silky and smooth). These will be hopefully my next successes but first, I'm just enjoying the yummy drink that I hope to make over and over again. Enjoy!

130 grams soya beans
water for soaking beans
60-90 grams sugar
600 grams water
400-500 grams hot water
nut bag for straining

1. Place soya beans into TM bowl. Soak for at least 6 hours or overnight if possible. If for 6 hours, I use hot water. Water must cover the beans.
2. Using the TM steaming basket, strain the excess water from the soaked beans.
3. Add 600 grams water into TM bowl. Blend 20secs/ speed 9. Scrape down sides and then add sugar (I use the whole 90 grams).
4. Cook 25mins/ varoma/ speed 3. You will find that the liquid bubbles up to the MC hole. When this occurs, decrease the temperature to 100C (by pressing the 100C button) for the remainder of the cooking time.
5. Add the remaining 400-500grams hot water and mix 3secs/ speed 3.
6. Using an extra bowl that is about 1.5L in capacity, place the nutbag over and then pour the soya bean liquid into the bag to strain. You can see after I have done this, my bag is just strung up over the bowl so it can continue to drip out.


7. If you are using a very fine material like a nutbag, feel free to squeeze out the liquid for maximum effectiveness. If your bag is not very fine, I don't recommend doing this as you will get the pulp pushed through which is not very nice to drink!
8. Taste for sweetness and adjust if required. 

Makes ~1-1.2L

Bon Appetit xx

Tips: the nutbag that I use has been so useful and easy to clean compared to a muslin cloth. A quick rinse and all the pulp is gone. I bought this one at a health food store.

Sunday, 13 July 2014

{everyday spaghetti bolognese in hermie}


There is not one person who I know that does not like spaghetti bolognese. Everyone has their own take on it but one thing that remains constant is that it is a regular in most households. It's a great combination of pasta, vegetables and meat. So, when serving it up to your family, you know they are eating a hearty, healthy, tasty meal especially when it comes to feeding the fussiest of toddlers!

It is also very versatile; the following recipe doubles as the sauce if you're going to make a lasagne (in Hermie) and when you make the full amount, there's enough for a family lasagne and a serve of bolognese as is. Who doesn't like 2 meals for the effort of 1? Enjoy xx

1 carrot (~120 grams), roughly chopped
1 zucchini, roughly chopped
1 brown onion, peeled & halved
3 garlic cloves, peeled
1 celery stick, roughly chopped (optional)
50 grams olive oil
500 grams beef mince, slightly frozen in 4cm pieces
5 medium size mushrooms, sliced
3 dried bay leaves
1 tablespoon TM vegetable stock concentrate (from the EDC)
salt to taste
50 grams tomato paste
800 grams chopped tomatoes (1 large tin)


1. Place carrot, zucchini, onion, garlic (& celery) into TM bowl and chop 3secs/ speed5. I find this still provides texture and the vegetables are not too fine. Scrape down sides of bowl.
2. Add olive oil and cook 5mins/ varoma/ reverse/ speed1. Scrape down sides of bowl.
3. Add mince to TM bowl. Cook 5mins/ varoma/ reverse/ speed1. Scrape down sides.
4. If using mushrooms, add them to the TM bowl. Also add bay leaves, TM stock, salt, tomato paste, and tomatoes to TM bowl. This will bring the contents near the 'max' mark on the bowl. Give the sauce a quick manual stir with the spatula and cook 15mins/ 100C/ reverse/ stir speed.
5. Check the sauce and manually stir through again. Cook for a further 25mins/ 90C/ reverse/ stir speed.
6. Serve with pasta and grated parmesan cheese.

Makes ~1.6L of sauce

Bon Appetit xx

Notes: slightly frozen mince is used as it takes longer to break down and therefore, the bolognese sauce still has the texture to it when fully cooked.

Monday, 10 March 2014

{indonesian spicy roast chicken with hermie}


There are many ways to roast a chicken but for some reason I seem to find ones with Asian flavour combinations appeal to me more. It's probably because growing up in a Chinese Malaysian household, spices and herbs like ginger, spring onion, coriander, turmeric and chilli were a weekly staple, bought and used in everyday dishes. My palate is less familiar with 'western' herbs such as tarragon, sage and rosemary. Having said that, one of the unexpected benefits of having Hermie is that I am being more creative and my family is eating a larger variety of food. I'm getting better at cooking western meals and am slowly discovering new flavour combinations.

Having said that, there are times that I just crave rice and a meat and a vegetable dish. The recipe below is really handy and fits into this category. It comes from an 'essential' asian cookbook that has sat on my bookshelf for a while and I've finally had time to peruse it and mark out all the recipes I want to try. First off the list is this Indonesian Spicy Roast Chicken recipe. It's great to use the whole chicken if you're entertaining friends and family, however, if you want to keep it simple, just use some chicken pieces like drumsticks instead. Enjoy!

1.5-1.6kg whole chicken
1 red chilli
3 cloves garlic, peeled
2 teaspoons peppercorns
5 grams brown sugar
40 grams soy sauce
2 teaspoons turmeric
20 grams lime juice
drizzle of vegetable oil (can use butter)

1. Pre-heat oven to 180C.
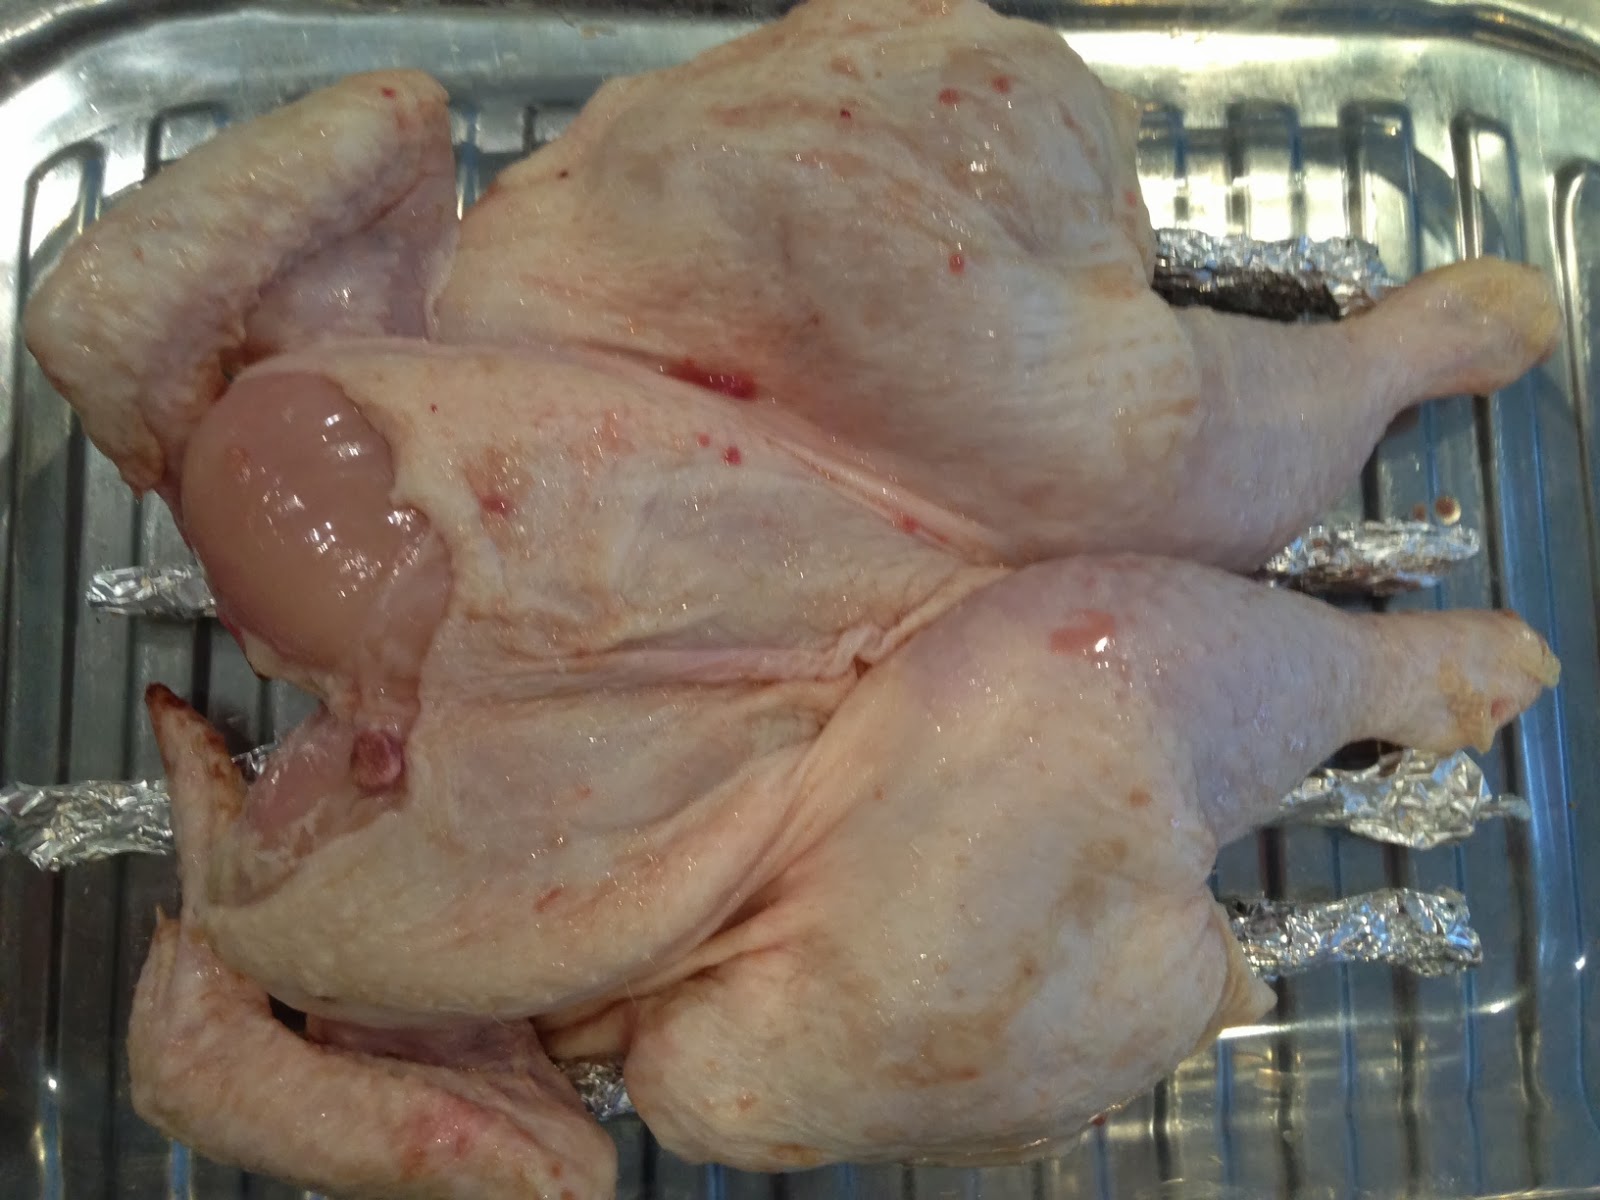
2. Butterfly whole chicken and place on a roasting rack in a baking tray. Roast for 30mins.


3. Meanwhile, prepare marinade. Place chilli, garlic, peppercorns & brown sugar into TM bowl. Chop 5secs/ speed7. Scrape down sides of bowl.
4. Add in soy sauce, turmeric & lime juice (tip: squeeze lime directly onto lid with MC in to prevent pips going into bowl) and mix 3secs/ speed 4.
5. Take chicken out of oven after 30mins and pour marinade over the top. Using a basting brush, make sure it is spread out all over chicken. Drizzle over some vegetable oil over the chicken and roast for another 30-40mins until juices run clear.
6. Cut Asian style and serve with steamed rice and green vegetables (my favourite is to serve with Kang Kong stir fried with blachan, garlic and chilli).


Serves 4-6 in a shared meal.

Bon Appetit xx

Tips: To turn this into an all-in-one meal, after step 5, do not rinse the TM bowl out. Fill with 1500grams water and steam (300-400grams) rice in Hermie. This will produce a flavourful rice to go with your chicken. Cook for about 15-20mins/ varoma/ speed2. In the last 5 minutes, add some green veg, oyster sauce and sesame oil to the varoma and there you have it!

Wednesday, 26 February 2014

{apricot jam in hermie}


I'm not one of those people who are lucky enough to have a large backyard to grow my own fruit and vegetables so for the whole of summer, I've been on the lookout for cheap, nearly overripe apricots. Why? Because Apricot Jam is Mr S's most favourite jam flavour and I can see why. He has grown up with amazing Auntie's that have made jam for most of his childhood and having tasted it myself, it's super tasty. It has a beautiful chunky texture (so you know there are real apricots in there) and the orange colour is vibrant and natural.

I don't have their recipe but I'm trying to do Apricot Jam justice. This is best served on a chunky piece of toast with a dollop of thick cream in the middle. Or, if you're more adventurous, make some homemade rough puff pastry and fill with jam for an Apricot Danish. Delish!

650-700 grams apricot, quartered and de-stoned
1 green apple, quartered and de-seeded
30 grams lemon juice
450grams raw sugar
150grams water (1.5 MC's)

1. Add apple to TM bowl and chop 3secs/ speed 6. Scrape down sides of the bowl.
2. Add apricot, lemon juice and sugar to bowl. Cook 80mins/ 100C/ speed2 with MC on it's side (or the TM basket on the top).
3. Pour into sterilised jars. I find using my old baby bottle steriliser the easiest way to sterilise jars. If you don't have one of these lying around, sterilise the old fashioned way either boiling or putting them in the oven (Disclaimer: make sure you read up how to do this properly!)

Bon Appetit!

Makes about 2x 400ml jars


Tip: If you want a smooth jam, wait until it has cooled for about 15mins and then blend 1min/ speed9.

Saturday, 22 February 2014

{green papaya and crab salad with hermie}


This is a traditionally a vietnamese salad and is based on Luke Nguyen's salad that can be found here. It's so easy to make with the help of the Thermomix because you can put all the dressing ingredients in Hermie to cook and then get on with the task of julienning the green papaya (or mango) and removing the crab meat from the shells. Today, we're celebrating Valentine's day and this will be served as the entree for our dinner. Enjoy!

salad Ingredients:
5 perilla leaves
5 mint leaves
5 Vietnamese mint
5 Asian basil leaves
1 green papaya (paw paw), peeled and julienned
2 blue swimmer crabs, cooked and meat removed
1 long red chilli, stem removed
1 tablespoon fried red Asian shallots
1 tablespoon fried garlic chips
1 tablespoon crushed roasted peanuts (optional)

nouc mam cham dipping fish sauce:
2 garlic cloves, peeled
1 bird’s eye chilli, stem removed
60 grams fish sauce
60 grams rice vinegar
40 grams sugar
125 grams water
40 grams lime juice

1. Place perlilla, mints and basil leaves into TM bowl. Chop 3 secs/ speed5. Set aside for later. Rinse the bowl out for step 2 (no need to dry).
2. We now proceed to the dipping sauce. Place the garlic and chilli into TM bowl and chop 3 secs/ speed6. Set aside in a bowl that you will later use to mix the rest of the dressing in. Scrape down the sides.
3. Add the fish sauce, vinegar, sugar and water to the bowl and cook 6mins/ 90C/ speed1
4. Meanwhile, julienne the papaya and place in bowl with the reserved herbs from step 1. 
5. Squeeze lime juice onto lid of TM bowl (so the pips don't fall in and mix 2secs/ speed 2.
6. Store in a container in the fridge for up to 5 days.
7. Slice red chilli and add this and crab to bowl with papaya and herbs.
8. When ready to serve, drizzle over sauce, mix and serve immediately.

Bon Appetit xx

Serves 2

Tips: If you julienne the papaya or mango before hand, you can keep them crisp by storing them in a bowl and covered with ice water.

Saturday, 25 January 2014

{CNY: chicken & jellyfish in hermie}


Chinese New Year is one of those celebrations that is always celebrated in my household. We may not be the most 'Chinese' of families however, I like to think that we keep a couple of the most important traditions to the celebration; the reunion dinner (a feast!) and the giving of 'hong pau' or 'red envelopes'. The reunion dinner is celebrated on the eve of Chinese New Year and we either go to a chinese restaurant or someone's house. With our families ever growing and little ones about, in recent years we have done less of the restaurant and more 'pot luck' where everyone brings 1 (or 2) traditional dishes. This year being the first year that I've got Hermie (or the Thermomix) I'm interested in seeing what I can cook in it to make this time of year easier.

The first dish that I'm trying is a Chicken and Jellyfish dish. Jellyfish you say? It sounds weird to non-Chinese people but in fact, it does not taste like much but instead provides texture to this dish. It can be found in Asian Grocers as is (usually near the green vegetables) or pre-prepared in packets sometimes with assorted flavourings. I buy the 'as is' variety as often the pre-prepared packets have MSG which I stay clear of.

When you have a look at this recipe, there's a bit of cooking and lots of mixing. However, I have found that using Hermie makes a big difference. You see, the most tedious part of this dish is the cooking and shredding of the chicken. I'm impatient and always want to shred the chicken apart as soon as it leaves the hot water and end up burning my hands. However, with Hermie, once the chicken is poached, you can literally shred the chicken in a few seconds. Time Saved! I hope you enjoy this and let me know if you try it.

1 good size handful of bunch coriander
1 chicken breast (about 350 grams)
330-350 gram uncooked jellyfish
1 tablespoon soy sauce
2/3 tablepoon sesame oil (preferably Ghee Hiang brand)
1/2 tablespoon Sriracha chilli sauce (or to taste)
2 tablespoons tomato sauce

1. Rinse off salt from jellyfish and soak in cold water for 2 hours. Change the water about every 30mins to reduce the amount of saltiness.
2. Meanwhile, place coriander into TM bowl and chop 2-3secs/ speed 6. Set aside in a bowl to be used for serving.
3. Place 1000 grams of water and chicken into TM bowl. Poach for 14mins/ 100C/ speed1/ reverse.
4. While the chicken is cooking, boil a kettle full of water. When done, empty the water soaking the jellyfish and give the jellyfish a final rinse. Place back in bowl and pour over hot boiled water. Once it 'shrivels' up (about 1-2minutes), drain from the water and slice thinly. Place into the serving bowl with the coriander.

Jellyfish soaking
After hot water
sliced thinly
5. When chicken has finished, drain off the water and shred 3secs/ speed 4/ reverse. We want a rough, coarse shred, one that is not too fine so be careful as 1 second can make a big difference.
6. Place chicken into serving bowl with the rest of the sauces and mix through. Put in the fridge until cool and serve as part of a banquet style meal.


Tips: This is best made the night before or morning of the dinner as the flavours develop further and should be served cold.

Monday, 6 January 2014

{chicken nuggets in hermie}


I was looking around the internet and social media trying to gain a little inspiration for something new Miss A could try eating. Everywhere you see, children love eating with their hands to feel what a new food is like and nuggets fit perfectly into this category. The trouble is, is that nearly every recipe I have found, contains a bit of parmesan cheese and uses an egg wash before crumbing. These are 2 things that Miss A cannot eat. 

Therefore, the below recipe is my take on the classic Chicken Nugget albeit a bit healthier and full of those ‘hidden’ vegetables that all parents like to sneak in. I find by adding a good amount of veggies means that the chicken breast does not dry out too much and the nuggets are still moist to eat. Enjoy xx

6 weet-bix
500-600 grams chicken breast, cut into ~4cm chunks
drizzle of garlic oil
1 small zucchini
1 leek, white part only, cut into 2 
300 grams sweet potato, cut into ~1 cm slices
5 turns of the ”Chef’s Choice” Sicilian style seafood seasoning or to taste (optional) - See note

1. Pre-heat oven to 200C.
2. Place weet-bix into TM bowl and crush 3secs/ speed 6. Set 2/3’s aside in a small shallow bowl. Place the rest of the weet-bix in a large bowl that will be used to combine all ingredients.
3. Place chicken into TM bowl. Mince 2-3 times/ 1-2secs/ closed lid position/ turbo. Set aside in the large bowl. 
4. Place zucchini, leek & sweet potato into TM bowl and chop 3secs/ speed6. Add garlic oil over the chicken. You don’t have to add the garlic infused oil however, I find it adds another layer of flavour to the nuggets. Saute 3mins/ varoma/ stir speed/ reverse. Add to chicken in bowl & add seasoning or salt if using.
5. Mix with your hands and form either nugget style shapes or balls. Coat in the reserved weet-bix crumb and place on a lined oven tray. (This mixture is quite wet but works well if you use one gloved hand to make the nugget and one ‘naked’ hand to crumb the nugget.)
6. Once all nuggets/balls are complete, give them a quick spray of olive oil over the top.
7. Place in a pre-heated oven for 15minutes. Take the nuggets out and flip them over. Increase the temperature of the oven to 220C and bake another 10 minutes or until golden.
8. Take out of the oven when done and cool slightly before serving with your favourite tomato sauce.


Makes 40-45 nuggets.

Tips: These can be cooked in a frypan instead of oven baked however, they might end up a bit oilier. Also, I have used weet-bix to absorb a bit of the moisture in the mix however, a good batch of bread crumbs thrown in would do the trick too. Finally, I like to use a white zucchini because my Miss A loves to scrutinize her food before eating and it does not stand out as much in the mixture as the more common green zucchini.

Note: This seasoning looks like this:

Sunday, 29 December 2013

{muesli bars in hermie}


One of the classic lunch box snacks that we all know is a muesli bar. However, these days when you visit the local supermarket and pick up a box, they are fill with who knows what; many an ingredient that is either a number or hard to pronounce. They are often very sugary and filled with not much. These ones below are great because although quite sweet with dried fruit, you can control what and how much you like to add and most of the other ingredients are easily substituted for an alternative. Having said that, I make these as a dairy free muesli bar for Miss A and the rest of the family loves them too. The use of coconut butter gives them a lovely aroma and fills the house when baking with a beautiful scent. Feel free to use nuts instead of seeds however, we also have a nut allergy in the house and make do without.

120 grams dried (sulphite free) apricots
140 grams butter (or substitute.... I use half nuttelex, half coconut butter to keep it dairy free)
70 gram rapadura sugar (or brown)
160 grams rolled oats
80 grams plain flour
30 grams sultanas
30 grams currants
3 tablespoons sunflower seeds
3 tablespoons pepitas

1. Pre-heat oven to 190C and line a 20cm square tin.
2. Place apricots into TM bowl and chop 10-15secs/ speed 5. The time will depend on how dry your fruit is and how large the apricots are. Set aside.
3. Add butter and sugar into TM bowl and melt 2.5mins/ 80C/ speed 1.
4. All the remaining ingredients and mix 15 secs/ speed 2/ reverse.
5. Pour into prepared tin and press down with the back of the MC.


6. Bake for 20-25 minutes until golden. Cool in tin and then cut into squares.

Makes 20 squares.

Bon Appetit xx

Tips: This muesli bar mix is also great just as a morning muesli served with your choice of milk (e.g. cows, rice, oat, soy etc). Instead of pressing into a cake tin to make a slice, just spread thinly over a baking tray and bake to about 15 minutes instead.

Tuesday, 26 November 2013

{coconut glutinous rice with mango in hermie}


Lately, I've been noticing that more and more people have eating requirements that are either Gluten Free, Dairy Free, Lactose Free, Sugar Free and more. I'm not sure what's happening to our bodies but we either are more in touch with how we feel or something we're eating is affecting us. My little Miss A is one of those such people and needs to eat Dairy and Egg Free. 

Having said that, as my family eat a majority of Asian food and in particular South East Asian, this is not that hard. In a lot of countries like Malaysia and Singapore, it's not that common to eat or drink a lot of dairy and desserts like this are of the norm. They are delicious and actually very easy to make with or without a Thermomix. Enjoy x

200 grams white glutenous rice
250 grams hot water
750 grams water for steaming
200 grams coconut milk, reserve the rest for serving
50 grams sugar
1/4 teaspoon of salt
2 large mangos, sliced thinly
2 teaspoons sesame seeds or roasted coconut shavings for serving

1. Place rice into TM bowl. Add hot water and sit for 15 mins.
2. Using TM basket, drain off the water and keep rice in TM basket.
3. Place water into TM bowl for steaming and insert TM basket. Steam 40mins/ varoma/ speed 3. If you find the water bubbling too much, put the temperature down to 100C.
4. Scoop rice into TM Server and cover.
5. Meanwhile, pour out excess water from TM bowl and dry. Add coconut milk, sugar and salt and mix 2mins/ 70C/ speed 2 until sugar is dissolved.
6. Add coconut milk mixture to rice and mix through with spatula.
7. To serve, place rice in bottom of bowl or glass, top with mango, reserved coconut milk drizzled over and sesame seeds.

Serves 4

Bon Appetit xx

Tips: This is a great dessert for a dinner party as you can steam while the main is eaten. Also, you could use a mixture of black and white rice for a more exotic look. Alternatively, the rice could be served with an extra dash of coconut milk and maybe some coconut or palm sugar syrup. Lastly, if your mangos are not as sweet as they should be, increase the sugar to 70-80 grams and it will taste better.

Wednesday, 16 October 2013

{kaya spread in hermie}


I grew up eating Kaya on toast for breakfast and to this day, it is my favourite spread to have on bread. However, it was something that was processed, came in a tin and for some reason, was quite a bright orange. The original way to make it is to stir the ingredients in a pot for a long time which is not only time consuming, but also tiring. Since getting Hermie, I've tried a few recipes to make this myself, but none have been quite right. They were always a bit like a coconut egg custard instead of a smooth, coconutty spread. I'd been searching all over various food blogs and recipe books and have finally found one that I'm happy with. A big thanks goes to Sam Tan's blog on which this is based.

200 grams brown sugar 
2 egg yolks
3 whole eggs
2-3 pandan leaves, knotted
320 grams coconut milk, the thick white kind

1. Add sugar into TM bowl and mill (if required) 10 secs/ speed 10.
2. Add eggs into TM bowl and mix with sugar until sugar is dissolved 30secs / speed 3.
3. Cook egg sugar mixture 10mins/ 90C/ speed 3.
4. Add coconut milk and pandan leaves and cook 40mins/ 100C/ speed 2/ reverse. Leave the MC out from the lid (or sit it sideways to prevent less splutter from the top) to let the steam escape and the kaya reduce.
5. Check to see if it is thick enough and if not, keep cooking in 10 minute intervals until it is just right.
6. Let it cool for about 10 minutes and then quickly blend 10secs/ speed 9 to get a super smooth consistency.
7. Serve on some hot toasty bread with a big knob of butter melted.

Makes about 400ml

Bon Appetit xx

Tips: This kaya should last 3-4 weeks in the fridge (if you can't resist eating if all the time!).


Wednesday, 9 October 2013

{cauliflower soup with chorizo in hermie}


The weather is finally warming up but there's still time for a soup recipe. This one is not heavy but full of flavour, taste and texture. I originally made this soup because I was out of ideas for dinner and already had a loaf of spelt bread baking in the oven and wanted something to go with a fresh loaf of bread. After staring at the inside of the fridge for a minute or 2 for some inspiration I came up with this soup. I love that it can be made with basic pantry staples (without the chorizo) and when you add the chorizo, you're also adding the wow yum! factor. 

1 brown onion, peeled & halved
2 garlic cloves, peeled
20 grams olive oil + extra for drizzling
1 potato, peeled & cubed
1/2 cauliflour, in large florets
1 tablespoon TM vegetable stock (recipe in the Everday Cooking Book)
800 grams water
1-2 chorizo roughly dices

1. Place onion and garlic in TM bowl. Chop 3 secs/ speed6. Scrape down sides.
2. Add oil to bowl and saute 2 mins/ varoma/ speed1/ reverse.
3. Place potato and cauliflour into TM basket. Add water and stock into TM bowl and then put basket on top. Cook 15mins/ varoma/ speed 3-4 or until potato is soft.
4. Meanwhile, fry chorizo in a frypan until slightly crispy. Set aside for serving.
5. Once cauliflower and potato are cooked, empty TM basket into TM bowl with the rest of the liquid. Blend 10 secs/ speed9 (gradually increasing from 1-9). If this is not smooth enough for you, use the turbo button until right consistency is achieved.
6. Pour into bowls and top with pepper, a drizzle of olive oil and chorizo. Serve with freshly made bread and lots of butter.

Bon Appetit xx

Thursday, 3 October 2013

{mongolian lamb in hermie}


When I got married I was quite young and this meant that I had not lived outside of the family home yet. So, when I started living with Mr S all I knew how to cook were the things that my mum had made for us and showed me how to put together. 

The original recipe that this one is based on is one of the first recipes that I tried as a newlywed and it was so tasty that it made it as a regular on the turnover of dishes every fortnight or so. I don't know how it slipped off that menu but lately I'd been feeling like we were in a meal rut and when I looked over past menu plans of late, we actually were eating the same meals over and over again without much variety. 

I looked at my bookshelf full of recipe books for inspiration and found the book that this one was in. It has some tweaks done to it and has also been converted to be made in Hermie the Thermie. Enjoy!

2 gloves garlic, peeled
10 grams ginger (big thumb), peeled
450-500 grams lamb fillet, sliced
30 grams vegetable oil (canola, rice bran)
3-4 stalks spring onions, cut into 1 inch lengths
30 grams Shao Xsing Wine
20 grams soy sauce
2 tablespoons Hoisin sauce
1 teaspoon sesame oil
chilli sauce (optional)

1. Add garlic and ginger to TM bowl. Chop 4secs/ speed 7. Scrape down sides of bowl.
2. Add butterfly attachment. I do this as I find that the meat does not 'catch' on the blades as much and makes a better looking dish.
3. Add lamb to TM bowl and saute 8mins/ varoma/ stir speed/ reverse. Take OUT butterfly.
4. Add spring onions and all other sauces (including chilli sauce if using) and cook a further 5mins/ varoma/ stir speed/ reverse.
5. Serve with steamed rice and vegetables.


Serves 4 as a shared meal.

Bon Appetit xx

Note: I know that the lamb backstrap fillet is quite an expensive cut and when used in this dish, it very tender and juice. However, if you can't bear to part with $49.95kg, then my butcher also suggested using a mini lamb roast (at just over half the price) which he cut into strips for me. This is actually what I used this time and the meat was still very tender and not chewy.

Thursday, 12 September 2013

{garlic, prawn & spinach pasta in hermie}


If you follow me on facebook you would know that I'm a big fan of meal planning. This is so that I know what we're eating during the week as well as spending the least amount of time shopping for food during the week. It also means that if I'm buy a special ingredient, I try and make other meals that will incorporate the rest of the ingredient so there's less wastage.

Having said all of that, this week I have done the complete opposite and have lived 'by the seat of my pants' without planning any nights meals. It has just gotten away from me whilst juggling a sick Miss A, consultant training to become a Thermomix Consultant, blogging, driving Miss I around to activities and everyday chores around the home. 

Last night, it had already reached 4pm by the time I even thought about what to have for dinner. That's pretty late for us as we usually have dinner by 5:30 to 5:45ish. Yes, we eat at an early bird time but it works for our family! So, I scratched my head and looked in the freezer to see what meats/seafood we had. I usually start with this for the basis of a dish and then the rest comes naturally. I came across some recently bought prawns and then half a packet of baby spinach that I had been using to practice some Thermomix demonstration dishes. As soon as I had these 2 ingredients, this dinner was formed in my head. All the other ingredients are pantry staples that are always on hand for most cuisines. 

The sauce is whipped up in Hermie and the pasta cooked normally on the stove as per the packet instructions. If you like, you could add water to the TM bowl when cooking the sauce and then cook the spaghetti in the TM bowl if preferred. Enjoy!

3-4 cloves garlic, peeled
3-4 spring onions, cut into 10cm lengths
20 grams olive oil
400 grams canned chopped tomatoes
12 prawns, deheaded, shelled
chilli flakes (optional)
50 grams baby spinach
salt to taste
spaghetti for 2.5 people

1. Place saucepan filled with water on stove to boil. 
2. Place garlic and spring onion into TM bowl. Chop 3-4 secs/ speed 6.
3. Add olive oil to TM bowl and saute 2mins/ varoma/ stir speed/ reverse. Scrape down sides of bowl.
4. Add tomatoes (chilli flakes if using) and salt to TM bowl and cook 10-12mins/ 100C/ stir speed/ reverse.
5. Add prawns and cook 6-8mins/ 100C/ stir speed/ reverse.
6. Meanwhile, cook spaghetti in prepared saucepan as per packet instructions.
7. Finally add spinach and cook 1mins/100C/ stir speed/ reverse.
8. Serve over cooked spaghetti with a drizzle of olive oil over the top.


Serves 2 adults and 1 child.

Bon Appetit xx

Thursday, 5 September 2013

{strawberry jam in hermie}


When there is an abundance of fruit and you want to take advantage, making jam is a great way to use up all the cheap, in season, juicy fruit. I always thought that jam making was a laborious task but I think that's because most people always make large quantities and it involves quite a bit of manual labour. With Hermie, it is quite a different story and my part only took less than 5 minutes to perform. 

Here in Adelaide, we are experiencing a strawberry frenzy at the moment and this recipe below is my adjusted version of the "Everyday Cooking" Thermomix cook book using about one and a half punnets (as my children love to eat them as is!). My husband's Aunty if great at making jam and in particular, apricot jam. When they are in season, this is one of the things I'm going to attempt in Hermie. I would really like to see what her opinion is of this jam compared to doing it the traditional way.

rind of 3/4 of a lemon
30 grams lemon juice
350 grams fresh strawberries, washed & hulled
200 grams sugar (can be adjusted to taste)

1. Place rind of lemon in TM bowl. Zest 45-60secs/ speed 9.
2. Place all other ingredients into TM bowl. Cook 60mins/ 100C/ speed2.
3. Store in a steralised jar (I put them in the oven to steralise) and then keep in the fridge. Serve with freshly made crusty bread and if you're feeling naughty, a dollop of cream on the top!

Make about 275 grams.

Bon Appetit xx

Tuesday, 3 September 2013

{review: pandan chiffon cake in hermie}


There are cakes and then there are chiffon cakes. Until recently, I didn't know that they are also referred to as Angel cakes. Anyway, I first came across this mysterious cake quite a number of years ago as a child when my Aunty made an orange chiffon cake. It was light, citrusy and a nice orange colour. Then, when I was shopping with my mum in an Asian Grocer shop, I noticed that they had for sale another chiffon cake that was green! It was flavoured with pandan leaves and tasted sooo divine. Since then, I have wondered how this cake was made and if I could do it myself.

Before I had the Thermomix, I had attempted to make a pandan version using another bloggers recipe. It was only half successful due to getting distracted when the cake came out of the oven and not turning the tin upside down fast enough. I just didn't realise that this was so important. It was slightly squashed but nonetheless, it tasted moist with pandan and coconut flavours. I was however very disappointed in myself because I like to think that I can cook anything!

So, this time round I was determined to get it right as this was going to be one of the yummy morsels of food at my sister's kitchen tea. Even though I hadn't tried the recipe from "A Taste of Asia" I decided to give it a go as it was very similar to the previous recipe used... I'm so glad that I did because the results are fantastic. I did however watch the last few minutes of baking like a hawk so that when the cake left the oven, I turned it upside down straight away to 'stretch' out the cake. It is definitely going to be a favourite 'must have' at family gatherings from now on.


Pandan Juice Extract:
This is best done 5-7 days before making the cake
20-30 Pandan Leaves cut into about 1cm lengths
200-250 grams water (to cover leaves)

1. Add all ingredients above to TM bowl. Blend 1-2mins / speed 9. What you are looking for is a pulpy green puree. If this is not enough, I just use the turbo button with closed lid position to keep going until it is done.
2. Strain the pulp into a jar and store in the fridge. Do not move as you want the dark green concentrate at the bottom of the jar. This is mine after 5 days. Pour away the lighter green liquid into something else (it can be used to make other pandan flavoured food) and you're left with the extract.


Pandan Chiffon Cake:
7 egg whites, room temperature
1 pinch cream of tartar
1 pinch salt
180 grams icing sugar (can reduce to 150 grams)
6 egg yolks
110 grams plain flour
30 grams oil (can reduce to 20 grams)
130 g coconut cream
2 tsp baking powder
2 tsp Pandan Juice extract

1. Pre-heat oven to 170ºC.
2. Clean and dry TM bowl thoroughly. Heat empty bowl for 2 mins/ 50ºC/ speed 2.
3. Insert Butterfly. Place egg whites, cream of tartar and salt into TM bowl and whip for 3 mins/ 50ºC/ speed 3.5.
4. Add icing sugar through hole in lid, 1 tsp at a time for 2 mins/ 37ºC/ speed 3 until fully incorporated. Set aside in separate bowl.
5. Without rinsing Butterfly, reinsert into TM bowl. Place yolks into TM bowl and beat for 6 mins/ 37ºC/ speed 3 until lemon in colour and doubled in volume.
6. Add remaining ingredients except egg whites and blend to form a batter for 8 seconds on speed 3. Remove Butterfly.
7. Place 60g of the egg white mixture into TM bowl and with dial set to closed lid position, incorporate for 20 seconds on Interval speed.
8. Pour yolk mixture out into egg white mixture and fold in gently using a large spoon until well blended.


8. Pour into chiffon tin and bake for 40-45 minutes or until done.
9. Remove from oven and invert tin to cool completely. Cake should just fall out once it is cool enough to release from the tin.


Bon Appetit xx

Notes: Make sure the tin is inverted immediately after removing from the oven. Apologies for not including a picture of a slice of cake... I forgot to take one at the kitchen tea! Also, my cake is a bit 'rough' around the outside because for some reason, I decided to use a skewer to 'help' the cake fall out. If I needed to do it again, I would use my head and use a serrated knife. This recipe is available on the recipe community.